Wednesday, February 29, 2012

Swatch Project

On Tuesday I stopped at Sally Beauty Supply and picked up some blank wheels so I could swatch all my polishes.  I get annoyed the ones that look different on the nail than they do in the bottle, so I wanted a way to know what it would look like before I started.  It was totally fun doing this, and it was nice to pull some polishes out that I have not used in a while and remember why I bought them.  There were a couple of purples in particular that I can't wait to wear again now.

My polishes  
Reds and Pinks

Some Blues

Crackles and Glitters
I don't have a HUGE collection, but compared to the average Joe it's not bad!

Monday, February 27, 2012

Funky Frenches

I like doing funky French manicures.  Here are some of the ones I've done and photographed in the last few months.  Sorry for the poor quality cell phone photos, these are from when I was just posting my nails on Facebook and not much else!


Christmas Mani - Clear base, Sinful Colors Show Me the Way tips with an Ulta After Party topcoat


One of my all time favorites - Ulta Alter Ego with Sally Hansen Chrome Black Pearl tips 


Sinful Colors Black on Black with Essie Matte About You, then a clear topcoat for glossy tips


Another Christmas Mani - Ulta Jaded with Ulta After Party tips


I'm not sure if the tips here were black or a dark gray, then I applied a 
Sally Hansen Nail Prisms South Sea Pearl topcoat


Classic white tips with a Sinful Colors Frenzy topcoat


Sinful Colors Rise and Shine with Sally Hansen Insta-Dri Emerald Express


I'm not sure what this pink is, I don't think I have it anymore.  Sinful Colors Black on Black tips

What's your favorite way to do a French tip?

Thursday, February 23, 2012

Water Marble!

I started seeing water marble posts on Pinterest a few months ago, and from the first time I saw it, I KNEW it was something I wanted to try. This week, I finally got around to trying it for the first time!


It turned out amazing! I had to revise my color choices a bit because some polishes work better than others (if you do a Google search you'll find different people's opinions of which work best). I had just bought Zoya Megan, a sort of purply light grey, so I used that as my base.


It took a few minutes of experimenting to figure out how to drop the polish into the water and how to use the toothpicks to create designs. Once I figure it out though, it only took maybe 30 minutes to do all my nails. Not bad at all! My designs are not as uniform as a lot of the water marbles I see, but I think I like it this way, a bit organic.

As you can see, I also finally got a bottle of Seche Vite - for some reason I hadn't checked at Sally Beauty Supply or Ed Wyse. I went to Ed Wyse for the first time and they have about a billion colors of OPI and Zoya, so I'll definitely be going back there! It is amazing, it dries and sets the polish so quickly!

Here's a crappy cell photo of how the designs turned out my right hand.


If you're interested in water marbling, I would highly recommend the following sources for tips.  I would not have been able to do this without seeing photo tutorials and video of how it's done.

Water Marble Picture Tutorial at Chloe's Nails (LOVE this blog!)
Water Marble Tutorial at Hey, Nice Nails!
Valentine's Day Water Marble by SimpleLittlePleasures on YouTube

The colors I used for this manicure were:
Zoya Megan (base)
China Glaze Swing Baby
Sinful Colors Bare
Essie Sew Psyched
OPI Wooden Shoe Like to Know

Wednesday, February 22, 2012

Sinful Colors Savage IS Savage

When I took off my multicolor crackle manicure, I was left with quite the unpleasant surprise, courtesy of Sinful Colors Savage.


This is what my nails looked like.  I had faint staining from the orange polish too, but I expected that a bit since I'd used a nail art polish instead of a regular formula.


Just look at these stains!  This was AFTER regular acetone polish remover, gel polish remover and trying lemon juice.  I ended up having to use an emery board to remove the spots.


My husband had bought this one, and honestly, it went straight in the trash.  I can't imagine having my whole nails painted with this then having it stain them this badly.  Have you had trouble with staining before?

Monday, February 20, 2012

Multicolor Crackle


I recently got a couple of new crackle polishes, and I'd seen the idea of a multicolored base under crackle several places and thought it would be cool to try.

The polishes I used for the base coat were Sinful Savage, Sinful Dream On, Piggy Polish Envy and the orange is Neon Pumpkin, which is a Nail Art Pen from Nubar.  The topcoat is Sally Hansen Ink Spill.

This was a really fun mani, and it lasted a few days.  The clear topcoat really made it pop since the Sinful polishes were matte - I didn't know before recently that most neon polishes come out matte - and the crackle also comes out somewhat matte.  I like the look a lot better with shine!

Friday, February 17, 2012

Roman Opulence French

I have been interested in matte nail polishes since I saw a photo of a French manicure with matte black polish and glossy black tips.  I've kept my eye out for matte finishes since they're not available in regular stores all that often.  I have Essie's Matte About You topcoat, but there's just something about a polish that dries matte on it's own that's fun to me.

For today's nailsI used Revlon Ruby Ribbon Matte Suede with China Glaze Swing Baby tips.


Please excuse my messy cuticles, I applied the polish in a funky way, put on the gold first then taped off the tips and put on the red.  I don't usually do tips that way, but this is a pretty deep red and I was a little concerned about staining.  They look nicer from a little further away!


This manicure is really rich looking.  It reminds me of Ancient Rome - grapes, wine, golden wreathes and opulence.  I really like the suede finish, and I love this China Glaze polish.  It's gold, but it leans a little more bronzey than yellow.  


Wednesday, February 15, 2012

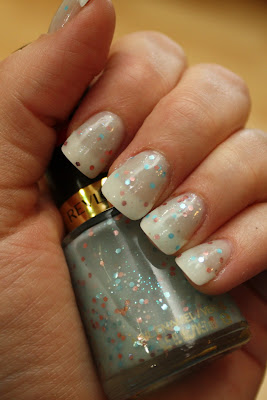
Revlon Whimsical

I had been keeping my eye out for Revlon Whimsical because I'd seen it on another blog and was curious about it.  I finally found it at Rite Aid, and I didn't love it in the bottle, but it was so different that I decided to buy it anyway.  It's got pink and blue hex glitter in a light blue jelly base, and some smaller blue and silver sparkles.


I went and got acrylic nails yesterday.  I had been thinking about it for a while for a couple of reasons.  I really like the square shape, but I just can't get my nails to do that.  I did it once, but within a day at least one of the corners had broken off.  I don't know what the trick is to natural, square nails.  I also like having some length, and once one of mine breaks, I have to cut them all because I can't stand uneven nails.

I'm still getting used to them, but it's kind of fun so far.  I don't love how thick they are, it makes for a rounder looking nail, but I do kind of like them.  I'd only had them one other time for my wedding, so I'll try them for a bit and see how I feel.


I've had some trouble with application with glitter polishes.  Several times, I've had a really hard time getting the glitter to stick without just following the brush off my nail.  This one has a pretty good formula and applies nice.  This is 3 coats, and the glitter stuck well.  I shook the bottle between each coat, which seemed to help.

Thursday, February 9, 2012

Sally Hansen Salon Effects: I Love Lacey

I have been wanting to try Sally Hansen Salon Effects since I first saw them in the stores.  They are sticky strips made of real nail polish that come in all sorts of colors and patterns.  Recently, Fred Meyer had them buy 2 get one free, so I finally got some.  Here's one of the ones I bought:


Cute!  For my first try though, I decided to test out the red lace pattern called I Love Lacey for my first time around, it seemed like a fun choice for my birthday weekend.


I LOVE them.  If they were more affordable, I would wear them all the time.  As it stands, you'll pay $8.50 - $10 depending on where you get them, which seems pricey for a one time use.  They do have sticking power though, so if you get your nails done at a salon it might be worth it to try these out.

I watched several videos on YouTube before applying them for the first time just to see what the process looked like.  A few of the reviews seemed to think they were difficult, but I had no trouble at all.  I found the entire process very easy.  I did have to re-do one nail because I chose the wrong size and could see a gap on one side, but it was easy to peel it right off since I did it right away.

It took me about a half hour to apply these, which for me seems great.  When I do my nails, it usually takes at least that long.  I like to get good coverage and allow for plenty of dry time, and if I'm doing something fancy like french tips or nail art, there is often waiting time between layers.

First, sorry for the bad quality photos - they were all taken with my cell phone.  They should be clear enough to see.


Here are the strips right after I put them on:


One of the great things about these is that there is no dry time!  It's weird to be able to go about your business right after a manicure and not worry about smearing it or denting the polish.  Sometimes nail polish can stay tender for hours and if you hit it or rub it the wrong way, it will ruin your manicure.  I did put a clear polish top coat over these because I thought it would help them keep from chipping around the tips of my nails.

Here are the strips after wearing them for 6 days:


As you can see, they still look pretty great.  One of my nails had gotten a slight chip at the tip, but it was barely noticeable.  You CAN see grow-out happening, which is one reason it's important to get them as close to the cuticle as possible when first applying them.  I found it to be slightly annoying after the fourth day or so, but I also realized it was not noticeable to anyone but me.

I did not do many dishes during the time I had them, but other than that I went about my routines as normal.  I would say that these have really great staying power - I can totally see them lasting the 10 days listed on the box.  Possibly longer, though the grow-out might start to be obvious at that point.  I only lasted for 6 days in them because I'm a polish-a-holic and wanted to do a new color after that many days.  If you want to try something fancy, but have no patience for polish or re-doing your nails every few days, these would be perfect!

Other than the price, the only downside to these is that they were a real bitch to remove.  The box says the come off with regular nail polish remover, and they DO... but it took me almost 30 minutes to completely remove the polish from my nails.  Part of it was that they come off weird, there were kind of... chunks?  Goo balls.  I'm pretty sure it was all a result of the sticky stuff that attaches them to the nails.  It was stuck all over.  Also, red polish is often difficult to remove from around the cuticles anyway, so that didn't help.

All in all, I still give them a thumbs up.  I love being able to have a patterned nail without all the tape or strips or brushes or stamps - I'm not great at freehand.  Compared to purchasing plates & stamps, these are also cheaper if you just want them for a special occasion.

Have you tried these?  What did you think?

I am a small time blogger.  No one paid me for this review, nor did anyone give me free nail polish (too bad!).  These are just my opinions about a product I tried & loved.  Originally published Nov 2011 @ Scientific Nature of the Whammy.

Tuesday, February 7, 2012

Rose Gold Mani

My current manicure is a rosy pink with gold flakes.  I had originally gone for a dark grey with a shimmer coat, but looking at it, I found that I really wanted something a lot lighter.  I actually found myself craving some sort of pastel green, purple, blue or pink cream, but I found I didn't really have any of those.  I picked up a couple at the drug store yesterday, so I'll try one out soon.  

In the meantime, I settled for this pink.  I used Maybelline Wet Shine in Wine Shine, an old polish that I've had forever, and it was ready to be trashed.  I don't even remember the last time it was opened. The brush was losing hairs everywhere, and the polish was thick and goopy.  Luckily it only took one coat to fully cover.  I topped it with one coat of Wet n Wild fastdry in The Gold & The Beautiful.  This glitter polish is really dense, and I didn't know if I liked it when I first put it on.  After topping it with a coat of Essie Matte About You, I was pleased with the results.


The polishes in their bottles:


I LOVE the Matte About You top coat.  I love experimenting with matte polishes, and being able to turn any of my polishes into a matte is so much fun!

Here's a close up shot of the polish - you can see that even though the gold looks like glitter in the bottle, it's actually really flakey.


Sunday, February 5, 2012

Glitter French

I'll be getting new manis up soon with photos taken with a REAL camera, but in the meantime I'll keep putting up some of my old manis that I've done.  This is one of my recent favorites.  I FINALLY got my nails into the shape I really wanted.  Of course, less than a day after I took this photo, one broke and I had to cut them.  I'm not sure how people maintain square nails without having acrylics.  Part of me thinks sometimes about getting shortish acrylics so I could have that pretty square shape, but I don't know if I want to pay to maintain them.


This French manicure was done with a topcoat of Ulta After Party, a clear base with silver and red sparkles.  I love to do this instead of a plain French.  Lovely and clean, but with a little glitz!